TL;DR
A closet can work as a tiny vocal booth if you combine smart placement, absorption, and gap sealing. Soundproofing isn’t just about foam—it’s about where you put materials and how you treat gaps and airflow. Properly ventilated, a closet becomes a surprisingly effective recording space.
Ever wondered why your closet sounds better for recording than your entire room? It’s not just the foam or blankets. It’s about smart placement, controlling reflections, and sealing gaps. You can turn even a tiny closet into a surprisingly good vocal booth—without massive renovation or full soundproofing. Learn more about acoustic dampening and placement.
This guide reveals how to optimize your closet space, whether you want better voice recordings or just a quieter workspace. You’ll learn how to use materials, position your mic, and avoid common pitfalls—so your recordings sound clear, full, and professional.
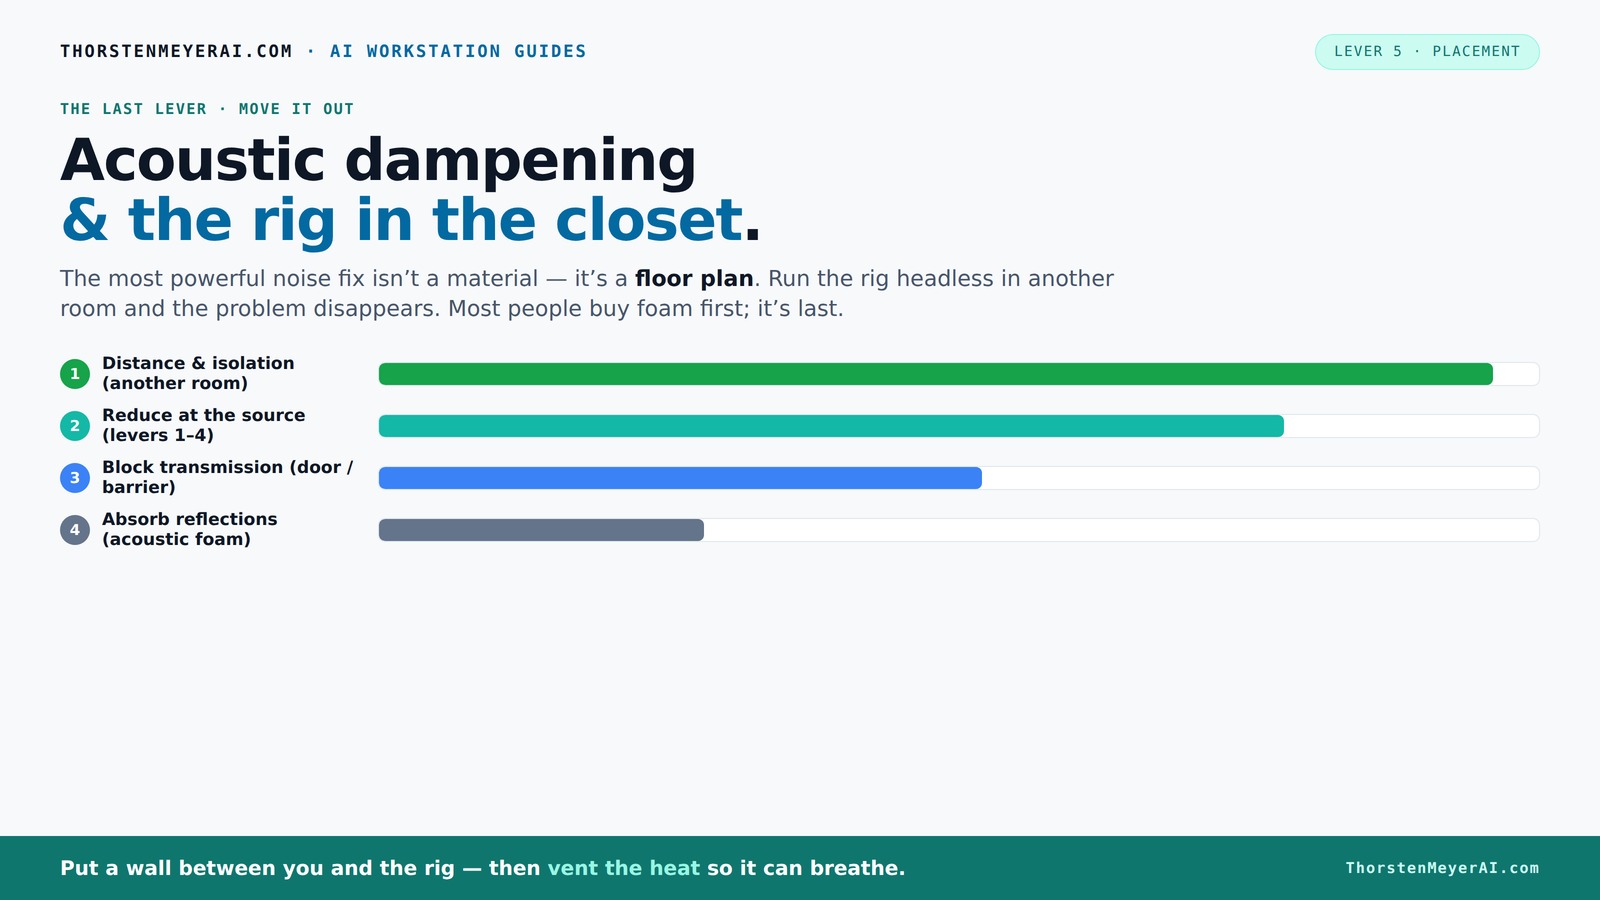
Acoustic dampening
& the rig in the closet.
The most powerful noise fix isn’t a material — it’s a floor plan. A rig you can’t hear because it’s in another room beats any amount of foam. Tap the approaches in Part 1 to see what actually works.
(another room)
(levers 1–4)
(door / barrier)
(acoustic foam)
Contain the noise, not the heat
Key Takeaways
- Sealing gaps and treating reflection points inside your closet greatly improve sound quality more than foam alone. Learn about sealing gaps and acoustic treatment.
- Position your mic at reflection points—using a mirror trick helps identify best spots for clear recordings.
- Ventilation is critical—without airflow, your rig overheats and fans will ruin your quiet setup.
- Layer soft materials like blankets and foam to absorb reflections and reduce echo without permanent modifications.
- A closet can be a surprisingly good vocal booth if you combine proper placement, absorption, gap sealing, and airflow.
XL Ultimate Portable Vocal Booth for Recording & Voice Over, Reduces Echo
The XL Ultimate Portable Vocal Booth — bigger and heavier than the original with more sound absorption, more...
As an affiliate, we earn on qualifying purchases.
As an affiliate, we earn on qualifying purchases.
Why a Closet Can Be Your Best Recording Spot
Closets are small, enclosed, and often lined with clothes or soft materials. These features naturally cut down on echo and reverb, creating a cozy space for sound capture. Think of it like a tiny vocal booth—smaller spaces with soft surfaces dampen reflections beautifully. Breatheatlas for indoor air quality tips.
For instance, a creator in a small apartment turned their closet into a voice-over booth by hanging blankets on the walls and sealing gaps around the door. The result? Clear, warm recordings without expensive studio gear.
The key advantage: you can isolate sound and minimize room reverb, which makes your voice recordings sound richer and less boomy. It’s a DIY trick that beats adding foam everywhere. See how to optimize your closet for soundproofing.

Focusound 52 Pack Acoustic Foam Panels 1" x 12" x 12" Sound Proof Foam Panles Soundproofing Noise Cancelling Wedge Panels for Home Office Recoding Studio with 300PCS Double-Side Adhesive
Soundproofing - Acoustic foam panels triangular grooves structure for better noise absorption, helps to reduce and absorb unwanted...
As an affiliate, we earn on qualifying purchases.
As an affiliate, we earn on qualifying purchases.
Acoustic Dampening vs. Soundproofing — What Really Matters
Acoustic dampening reduces echo and reflections inside your closet, making sounds clearer. Soundproofing stops noise from leaking out. Most DIY setups focus on dampening because it’s easier—adding blankets, foam, or clothes to absorb sound waves.
Soundproofing involves sealing gaps and adding mass, like putting drywall or dense mats on walls. But in a closet, the main goal is reducing reverb, not full noise isolation.
For example, hanging a blanket over your closet door cuts internal echo. But to prevent sound leakage, sealing gaps with weatherstripping or acoustic sealant is essential. Research shows that adding bass traps in corners helps tame low-frequency muddiness common in small booths.
Understanding this distinction helps you prioritize your efforts. Dampening improves the clarity and warmth of your recordings, while soundproofing prevents noise from disturbing neighbors or being affected by outside sounds. Both are important, but they serve different purposes and require different tradeoffs in effort and cost.

Audimute Soundproofing Acoustic Door Seal Kit - Door Sweep and Seal - (Large Size)
Includes (2) Door Seals (3/16" x 1/2" x 50') and (1) Door Sweep (1/2" x 1.5" x 25').
As an affiliate, we earn on qualifying purchases.
As an affiliate, we earn on qualifying purchases.
Placement Matters: Where to Put Your Absorbers and Mic
In a tiny closet, where you place your foam, blankets, and mic makes all the difference. The first step? Find your mic’s favorite spot—usually about 6-12 inches from the wall, aimed at the reflection points.
Next, position absorption materials on the wall behind the mic and at reflection points where sound bounces back—like the side walls and ceiling. Use a mirror trick: hold a mirror against the wall and see where your mic’s sound waves bounce.
For example, if your recordings sound boxy, try moving the mic closer to a soft surface or placing a large blanket behind it. Layering absorption near the mic reduces harsh reflections and creates a warm, tight sound.
Here's a quick list of placement tips:
- Place foam or blankets at reflection points around the mic.
- Use bass traps in corners to tame low-frequency build-up.
- Avoid parallel hard surfaces directly behind and in front of the mic.
Strategic placement is crucial because it directly influences how sound interacts within the space. Properly placed absorption reduces unwanted reflections that cause muddiness, while the right mic position ensures your voice is captured clearly and naturally. The tradeoff is that improper placement can lead to a boxy or hollow sound, so take time to experiment and find the sweet spot that balances clarity and warmth.

Studio Recording Microphone Isolation Shield with Pop Filter and Metal Tripod Stand, Studio Mic to PC Laptop Smartphone, Music Microphone for Recording Singing Podcasting
PLUG AND PLAY STUDIO MICROPHONE: This music mic does not require additional drivers, plug and play, and it’s...
As an affiliate, we earn on qualifying purchases.
As an affiliate, we earn on qualifying purchases.
How to Seal the Gaps and Keep Sound from Leaking
Gaps around the door and edges are the sneaky culprits for sound leaks. Sealing these is the simplest way to improve your closet’s sound isolation. Weatherstripping, draft stoppers, or hanging a blanket over the door can make a big difference.
For example, a streamer I know added weatherstripping around their closet door and hung a thick blanket over it. Sound that used to escape at high volume was contained, making the space much quieter for neighbors and roommates.
When sealing gaps, focus on:
- Door edges and hinges
- Any vents or holes
- Cracks around the frame
Proper sealing minimizes sound leakage, which is essential if you want to record without disturbing others or if external noise intrudes. The tradeoff is that over-sealing can make ventilation difficult, so balancing sound isolation with airflow is key. Small improvements, like foam strips or draft stoppers, often provide significant gains without complicating your setup. Discover more about sealing and soundproofing.
Do You Need to Treat the Floor and Ceiling?
Yes. Treating the floor and ceiling can significantly reduce reflections, which contribute to a boxy or hollow sound. A simple rug absorbs bouncing sound waves from the floor, especially if your surface is hard—like wood or tile—and prevents them from bouncing back into your mic’s pickup zone. This not only improves clarity but also prevents low-frequency buildup that can muddy your recordings.
Ceiling treatment is often overlooked but just as critical. Hanging foam panels or acoustic tiles can absorb sound waves bouncing overhead, which otherwise reflect back down and add to that hollow, echoey quality. This is especially important in small spaces where every surface acts as a reflector.
For example, a podcaster added a thick rug and some foam tiles to the ceiling, noticing a marked improvement in voice fullness and reduction of echo. The tradeoff here is minimal effort for significant gains in sound quality, especially in tight spaces where reflections are unavoidable.
Ventilation and Heat: Keeping Your Closet Rig Cool
Running a high-power AI rig in a closet or sealed space can turn into a heat disaster. Without proper ventilation, your machine overheats, throttles, and fans roar—defeating the purpose of a quiet setup. Visit Nightly Solutions for sleep and ventilation tips.
Active ventilation is a must. Install a quiet exhaust fan or create passive vents to allow hot air to escape while drawing in cooler air. Some builders even use ducted airflow systems with temperature sensors to keep things cool and quiet.
For example, one creator used a small, quiet exhaust fan with a duct that vents outside the closet. The temperature stayed stable, and noise from fans dropped significantly, proving that airflow design is just as important as dampening materials.
More info on cooling and heat management is here: how to reduce heat and noise.
Neglecting proper ventilation can lead to overheating, which causes hardware throttling, increased noise from fans, and potential hardware failure. The tradeoff is maintaining good airflow without introducing additional noise—this often involves choosing quiet fans, ducting, or passive vents to strike a balance between cooling and sound isolation.
DIY Materials That Work (and What to Avoid)
Cheap foam panels, moving blankets, and thick rugs are your best friends for DIY acoustic treatment. They absorb sound and reduce reflections without breaking the bank. But beware—some materials like dense carpets or thick drywall can do more harm than good if not used correctly. Dense, hard surfaces reflect sound waves, creating more echo and muddiness, which defeats the purpose of dampening. Similarly, overly thick or dense drywall can add mass but also reflect low frequencies, leading to a boomy sound.
For instance, a hobbyist used old comforters and egg crate foam to line their closet. Their recordings improved, with fewer echoes and a warmer tone. Conversely, using solid wood or metal surfaces without absorption just created more echo, making the sound muddy.
Quick tips:
- Use soft, porous materials for absorption—blankets, foam, clothes.
- Avoid dense, hard surfaces that reflect sound.
- Layer materials for better results—double blankets or foam layers.
Choosing the right materials involves understanding their acoustic properties. Soft, porous materials trap sound waves and prevent reflections, leading to clearer recordings. Hard, dense materials tend to reflect sound, increasing echo and muddiness. When in doubt, layering soft materials can improve absorption and reduce unwanted reflections. Avoid materials that are overly dense or reflective unless they are used in conjunction with absorptive treatments. For example, combining foam panels with hanging blankets maximizes absorption and minimizes reflections, creating a more controlled acoustic environment.
Putting it All Together — Your Step-by-Step Closet Rig Setup
Ready to build your ideal closet studio? Here’s a simple step-by-step plan:
- Seal the door with weatherstripping or hang a thick blanket.
- Place bass traps or thick foam in corners to tame lows.
- Position the mic at reflection points, about 6-12 inches from the wall.
- Hang blankets or foam on the walls and ceiling, especially at reflection points.
- Put a rug on the floor to absorb bounce.
- Install a quiet exhaust fan or create passive vents for cooling.
Voila — a small booth that sounds good, stays cool, and is far quieter than a full room treatment. Remember, each step involves tradeoffs: sealing gaps improves sound isolation but can limit ventilation, so find a balance that works for your specific needs. Layering absorption and sealing strategically will give you the best results without overcomplicating your setup.
Frequently Asked Questions
Is acoustic foam enough for a closet studio?
Not quite. Acoustic foam reduces echo and reflections but doesn’t block sound from leaking out. For best results, combine foam with gap sealing and strategic placement of soft materials. Foam alone won’t prevent sound from escaping or entering.
Where should I place the mic in a closet booth?
Place the mic about 6-12 inches from the wall, aiming at the reflection points. Use a mirror to find where sound bounces and position the mic to minimize harsh reflections. Keep it close to the soft surfaces for a warmer, clearer sound.
Do I need to treat the ceiling and floor?
Yes. A rug on the floor helps absorb bounce. Ceiling treatment with foam or acoustic tiles reduces echo overhead. Small tweaks here can make your recordings sound less hollow and more professional.
How do I stop sound from leaking through the door?
Seal gaps with weatherstripping, hang blankets, or add a door sweep. These simple fixes contain sound better, so your closet stays quiet and your recordings stay clean.
Should I use foam, blankets, or bass traps?
Use a combination: foam and blankets for mid/high frequencies, bass traps in corners for low frequencies. Layering materials yields better sound control in small spaces.
Conclusion
Your closet isn’t just a storage space—it’s a secret weapon for quality recordings. Focus on sealing gaps, strategic placement of absorbers, and proper ventilation, and suddenly it’s a mini studio.
It’s not about turning a closet into a full soundproof room. It’s about smart, targeted tweaks that make your voice sound warm, clear, and professional. Think of it as creating a tiny, cozy cave for your sound—quiet, warm, and perfectly tuned.